
ARTIST: Artwork © Keith Garvey.
In order to use the image in this tutorial you MUST purchase it from MPT
SCRAPKIT: I Rock by Missy of Scraps with Attitude
TEMPLATE: Template #18
Open your template
Ctrl+D to duplicate
Delete the copyright layer
Activate the bottom layer
Open IRock_Paper5
Copy and close
New raster layer
Paste into selection
Delete the original gray layer
Do the same with the rest of the layers
I used IRock_Paper6 and IRock_Paper20
For the solid layers, I just picked a color from my tag and filled with that color
Add a light white gradient glow to all your layers.
Add a drop shadow to all your layers 3, 3, 20, 3, black
The elements I used for tag are listed below
Resize them appropriately, usually about 50%
Just Copy and paste them as a new layer
See my tag for placement
Add drop shadows
IRock_Star1
IRock_GlitterTrail3
IRock_Heart1
I also moved the wordart to the top to accomidate my tube
Add your tube and add a light drop shadow
When you are done
Add your copyright and text
Merge visible and your done

ARTIST: Artwork © Jennifer Jankeso.
In order to use the image in this tutorial you MUST purchase it from CILM
SCRAPKIT: Cherries & Fairies by Mystical Illusionz
MASK: WSL_Mask302
New image 600 x 500
Open MIZ_PP8
Copy and close
New raster layer
Select all
Paste into selection
Apply your mask
Merge group
Open WP_IDL_STARSCATTER
Resize as needed
Copy and close
Paste as new layer
Open MIZ_JD_flowerframe2
Copy and close
Paste as new layer
Add a light drop shadow
The elements I used for tag are listed below
Resize them appropriately, usually about 50%
Just Copy and paste them as a new layer
See my tag for placement
Add drop shadows
MIZ_JD_tulipsingle3
MIZ_JD_organza1
MIZ_JD_satinflower3
MIZ_JD_grosgrainbow1
Add your tube behind your frame, I used the JPG version
When you are done add light drop shadows to all layers
Add your copyright and text
Merge visible and your done

GET IT HERE This is my part of Dazzling Scraps Saint Patrick's Day Collab. Now Free for your use :-)

ARTIST: Artwork © Dudleys Bear Den.
In order to use the image in this tutorial you MUST purchase it from Dudleys Bear Den
SCRAPKIT: Fantasize by Fantasy Dreams Designz
MASK: WSL_Mask206
New image 600 x 600
Open FD-Vana-paper13
Copy and close
New raster layer
Select all
Paste into selection
Apply your mask
Merge group
Open FD-Vana-elelemt47
Copy and close
Paste as new layer
The elements I used for tag are listed below
Resize them appropriately, usually about 50%
Just Copy and paste them as a new layer
See my tag for placement
Add drop shadows
FD-Vana-elelemt42
FD-Vana-elelemt69
FD-Vana-elelemt64
FD-Vana-elelemt73
FD-Vana-elelemt80
Add your tube and add a light drop shadow
When you are done
Add your copyright and text
Merge visible and your done

ARTIST: Artwork © PinupToons.
In order to use the image in this tutorial you MUST purchase it from CILM
SCRAPKIT: Fantasies in Pink by Mystical Illusionz (Me)
MASK: WSL_Mask187
Okay lets begin
New image 600 x 600
Open MIZ_pl_sparkles1
duplicate it a few times
Place it around your tag
Open MIZ_pl_PP9
Copy and close
New raster layer
Select all
Paste into selection
Apply your mask which is WSL_Mask187
Merge group
Open MIZ_pl_silverframe
Copy and close
Paste as new layer
Get your magic wand and select the inside of the frame
Expand by 5
Open MIZ_pl_PP22
Copy and close
Paste into selection
Add drop shadow to your frame
The elements I used for tag are listed below
Resize them appropriately, usually about 50%
Just Copy and paste them as a new layer
See my tag for placement
Add drop shadows
MIZ_pl_hearteyelet3
MIZ_pl_glitterheart4
MIZ_pl_rose5
MIZ_pl_butterfly5
MIZ_pl_heart4
MIZ_pl_satinbutterfly2
MIZ_pl_glitter1
MIZ_pl_tulip2
MIZ_pl_tulip5
MIZ_pl_cloud1
Add your tube
Add your copyright and text
Merge visible and your done

ARTIST: Artwork © Jennifer Jankeso.
In order to use the image in this tutorial you MUST purchase it from CILM
SCRAPKIT: Sweet Pea by Wicked Princess Scraps
MASK: WSL_Mask63
New image 600 x 600
Open WP_IDL_PP19
Copy and close
New raster layer
Select all
Paste into selection
Apply your mask
Merge group
Open WP_IDL_STARSCATTER
Resize as needed
Copy and close
Paste as new layer
Open WP_IDL_TATTEREDFRAME
Copy and close
Paste as new layer
Get your magic wand and select the inside of the frame
Expand by 2
New raster layer
Open WP_IDL_PP17
Copy and close
Paste into selection
Move layer beneath the frame
The elements I used for tag are listed below
Resize them appropriately, usually about 50%
Just Copy and paste them as a new layer
See my tag for placement
Add drop shadows
WP_IDL_VIOLET
WP_IDL_DOVE
WP_IDL_FEATHERSTAR
WP_IDL_TIGERLILY
WP_IDL_FRAGAPINI
Add your tube and add a light drop shadow
When you are done
Add your copyright and text
Merge visible and your done

Available in any stores I sell in located on the right side of my blog

ARTIST: Artwork © Dudleys Bear Den.
In order to use the image in this tutorial you MUST purchase it from Dudleys Bear Den
SCRAPKIT: Hickory Dickory by Stephs Graphx
MASK: WSL_Mask63
New image 600 x 600
Open SG_HickoryD_paper9
Copy and close
New raster layer
Select all
Paste into selection
Apply your mask
Merge group
Open SG_HickoryD_ovalframe
Copy and close
Paste as new layer
The elements I used for tag are listed below
Resize them appropriately, usually about 50%
Just Copy and paste them as a new layer
See my tag for placement
Add drop shadows
SG_HickoryD_flower
SG_HickoryD_flower2
SG_HickoryD_flower3
SG_HickoryD_flowerbranch
SG_HickoryD_mouse
SG_HickoryD_singleflower
Add your tube and add a light drop shadow
When you are done
Add your copyright and text
Merge visible and your done

ARTIST: Artwork © Scott Blair.
In order to use the image in this tutorial you MUST purchase it from MPT
SCRAPKIT: Ocean Blue Bear by Stephs Graphx
MASK: WSL_Mask247
IMAGE: Any beach image will do
New image 600 x 600
Open SG_OceanBB_paper7
Copy and close
New raster layer
Select all
Paste into selection
Apply your mask
Merge group
Open SG_OceanBB_frame2
Copy and close
Paste as new layer Open your ocean imageCopy and paste as new layerMove underneath your frameSet your blend mode to overlayDelete the part outside of the frame
The elements I used for tag are listed below
Resize them appropriately, usually about 50%
Just Copy and paste them as a new layer
See my tag for placement
Add drop shadows
SG_OceanBB_sun
SG_OceanBB_anchor
SG_OceanBB_button2
SG_OceanBB_button3
SG_OceanBB_button4
SG_OceanBB_flower1
SG_OceanBB_flower2
SG_OceanBB_flower3
SG_OceanBB_wheel
Add your tube and add a light drop shadow
When you are done
Add your copyright and text
Merge visible and your done

ARTIST: Artwork © Nils.
In order to use the image in this tutorial you MUST purchase it from MPT
SCRAPKIT: Sweet Pea by Wicked Princess Scraps
MASK: WSL_Mask253
WORDART: HERE
Okay lets begin
New image 600 x 600
Open WP_SP_PP11
Copy and close
New raster layer
Select all
Paste into selection
Apply your mask
Merge group
Open WP_SP_BUTTERFLYWIREFRAME
Copy and close
Paste as new layer
The elements I used for tag are listed below
Resize them appropriately, usually about 50%
Just Copy and paste them as a new layer
See my tag for placement
Add drop shadows
WP_SP_BAUGANVILLE
WP_SP_CASTLE
WP_SP_LOVEBUG
WP_SP_MOONANDSTARS
WP_SP_PUFFYBUTTERFLY
WP_SP_ROSEBUD
WP_SP_STARBUBBLES
WP_SP_WIREFLOWER
Add your tube and add a light drop shadow
When you are done
Add your copyright and text
Merge visible and your done

ARTIST: Artwork © Keith Garvey.
In order to use the image in this tutorial you MUST purchase it from MPT
SCRAPKIT: Paddy Oh Malley by Wicked Princess Scraps
MASK: Of Choice
Okay lets begin
New image 600 x 600
Open WP_POM_DOODLE
Resize it appropriately
duplicate it a few times
Place it around your tag
Open paper of choice for mask
Copy and close
New raster layer
Select all
Paste into selection
Apply your mask
Merge group
Open WP_POM_CIRCLEFRAME
Copy and close
Paste as new layer
The elements I used for tag are listed below
Resize them appropriately, usually about 50%
Just Copy and paste them as a new layer
See my tag for placement
Add drop shadows
WP_POM_BLACKPOTOFGOLD
WP_POM_FRAGIPINI
WP_POM_GLITTERBUTTERFLY
WP_POM_GOLDBOW
WP_POM_YELLOWFLOWER
WP_POM_WORDART
Add your tube and add a light drop shadow
Get the closeup of your tube
Copy and paste as new layer
Move beneath the frame
Effects - artistic effects - colored chalk - default
Blend mode - source luminance (L)
When you are done
Add your copyright and text
Merge visible and your done
To animate, I just lightened the mask by 10 and then 20 using the hue/light/sat tool
copied them in animation shop and then saved
Use a total of 4 frames
Frame #1 (regular)
Frame #2 (10 lightness)
Frame #3 (20 lightness)
Frame #4 (10 lightness)

Get it HERE
DO NOT SHARE, PLEASE DIRECT TO MY BLOG FOR DOWNLOAD
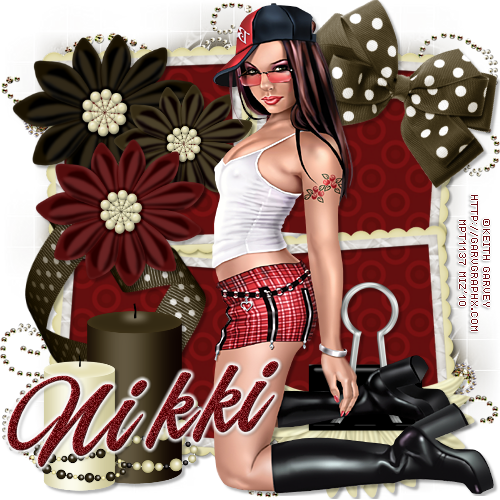
ARTIST: Artwork © Keith Garvey.
In order to use the image in this tutorial you MUST purchase it from MPT
SCRAPKIT: Cookies & Cream by Nikki of Creative Intentionz
MASK: WSL_Mask305
Okay lets begin
New image 600 x 600
Open CIZ-CNC-BlingDoodle2
Resize it appropriately
duplicate it a few times
Place it around your tag
Open paper of choice for mask
Copy and close
New raster layer
Select all
Paste into selection
Apply your mask which is WSL_Mask305
Merge group
Open CIZ-CNC-ClusterFrame4
Copy and close
Paste as new layer
Get your magic wand
Select the insides of the frame
Expand by 5
New raster layer
Open CIZ-CNC-Paper7
Copy and close
Paste into selection
Move beneath the frame
Add drop shadow
The elements I used for tag are listed below
Resize them appropriately, usually about 50%
Just Copy and paste them as a new layer
See my tag for placement
Add drop shadows
CIZ-CNC-Candle2
CIZ-CNC-Candle4
CIZ-CNC-CurlyRibbon2
CIZ-CNC-BeadFlower3
CIZ-CNC-BeadFlower2
CIZ-CNC-BeadFlower1
CIZ-CNC-BinderClip4
CIZ-CNC-Bow2
Add your tube and add a light drop shadow
When you are done
Add your copyright and text
Merge visible and your done

ARTIST: Artwork © Keith Garvey.
In order to use the image in this tutorial you MUST purchase it from MPT
SCRAPKIT: Crossed Emotions by Nikki of Creative Intentionz
MASK: WSL_Mask39
Okay lets begin
New image 600 x 600
Open ciz_crossedemotions_glitter5
duplicate it a few times
Place it around your tag
Open ciz_crossedemotions_paper10
Copy and close
New raster layer
Select all
Paste into selection
Apply your mask which is WSL_Mask39
Merge group
Open ciz_crossedemotions_ribbonframe1
Copy and close
Paste as new layer
Add drop shadow
Add your tube and add a light drop shadow
The elements I used for tag are listed below
Resize them appropriately, usually about 50%
Just Copy and paste them as a new layer
See my tag for placement
Add drop shadows
ciz_crossedemotions_necklace5
ciz_crossedemotions_butterfly3
ciz_crossedemotions_flower5
ciz_crossedemotions_flowerdoodle2
ciz_crossedemotions_star3
When you are done
Add your copyright and text
Merge visible and your done


